Navigating Homepage
Introduction: When using Fanbucket, it's essential to familiarize yourself with the different areas of the website to make the most of your experience. This article will guide you through the various sections of Fanbucket's website, allowing you to navigate seamlessly and engage with the platform effectively.
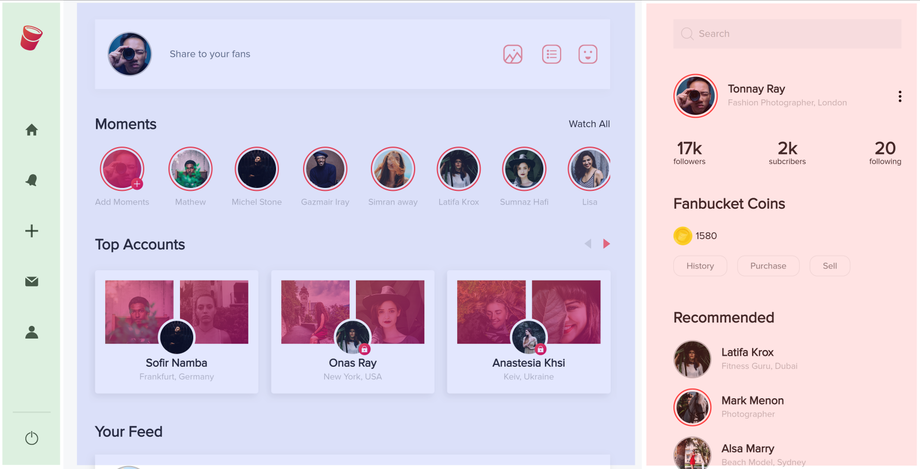
The Home Page serves as the starting point for every user on Fanbucket. It consists of three main zones that provide different functionalities.
Located on the left side of the page, the Navigation Zone contains a universal menu system with several buttons:
- The Fanbucket logo icon leads back to the Home Page.
- Five buttons in the middle of the page: Home, Notifications (indicated by a bell icon), + icon (to create a post), Messages (envelope icon for messaging), and User Avatar icon (leads to your profile).
- The Logout button, represented by a power icon, allows you to log out of your account.
The Browsing Zone is the primary browsing area. It includes:
- A posting capability section that allows users to create and submit posts from anywhere on the page.
- Moments, which are highlighted posts users can select and share with their fanbase. Moments appear as round circle icons using the user's profile picture.
- "Now Trending" users, showcasing popular and noteworthy content creators.
- "Your Feed" section, which displays posts from users you follow. Initially, for new users, random posts are shown to avoid an empty feed. After two days, these random posts are removed as the user starts following others.
The Discovery Zone includes:
- A search box where users can search for hashtags, usernames, or specific terms in posts.
- Your User section displaying your avatar, displayed name, and username.
- "Fanbucket Coins" section, indicating the Fanbucket coin currency with the number of coins you possess. It also includes buttons for History, Purchase, and Sell.
- History shows all transactions made with Fanbucket coins.
- Purchase allows users to buy coins for use on the platform.
- Sell enables users to sell their Fanbucket coins back to the system.
- "Popular Buckets" section, currently featuring a Trending section with popular hashtags.
- "Recommended" section, suggesting other users to follow.
- Hyperlinked text for "Terms of Service," "Privacy Policy," and "More."
Conclusion: By understanding the various zones on the Fanbucket website, including the Left Hand Zone with its universal menu, the Middle Zone for browsing, and the Right Hand Side Zone with search, user details, Fanbucket Coins, and other sections, you can navigate Fanbucket effortlessly. Enjoy exploring and engaging with the Fanbucket community!
We value user feedback and suggestions. If there are any specific features or improvements you would like to see in the "Navigating Fanbucket - Homepage" section or the overall Fanbucket platform, please share your ideas on our Fanboard at ✨ Wish list - Fanboard (fanbucket.com). Your input helps us enhance the platform and cater to the needs of our users effectively.


